As most of the world knows, we recently celebrated Chinese New Year & Valentine's Day (last weekend)...and everyone Canadian, other than the Olympic protesters, are showing their Canadian pride! Since I was born in Kentucky, I've lived my life being quite impartial, never taking sides or showing patriotism...but once the Olympics hit, I own more Olympics/Canadian items that I ever thought I would. Together, my boyfriend &I have bought: A big, plush Quatchi, Quatchi/Miga/Muk Muk stickers, Canada Hockey jerseys (got $25 ones from Wal-mart instead of the $135+ jerseys), a Canada hoody, the ever so popular mitts, and mini plushes & a Quatchi/Miga beanie for Kenny's nephew. I really want the Canada scarf from HBC but I can't find it anywhere!
Anyways, the Olympics have been very exciting. I got to meet Mary Murphy & Howie Mandel last Saturday! They were walking around Downtown (separately) and my boyfriend & I got the opportunity to take pictures with each of them! That was a very cool experience. Over the week, I've walked around on my lunch breaks and it's been interesting to see all the festivities going on in my own city. Vancouver is pretty damn amazing.
Canada's medal count: 4 Gold, 3 Silver, 1 Bronze
Well, onto the beauty part of my blog...A NAIL DESIGN FOR 3 OCCASIONS!
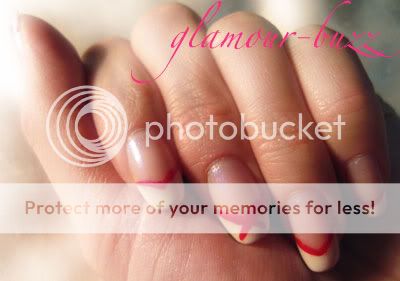
Last Friday, on the opening day of the Olympics and 2 days before Chinese New Year & Valentine's Day, I decided to paint my nails with a design that would suit all 3 occasions. Easy - I'd use red & white!
What I used: Orly base coat, China Glaze's "White on White", Red nail art pen, CND's "Blue Ice Shimmer" and Seche Vite top coat.
From the photos, you should be able to see what I've done. Basically, after using base coat, I applied white polish on the tips of my nails in a triangular shape...it's actually easier than the regular curved French style! After that, I applied red polish along the lines. I crossed the lines on my middle finger for a little extra style. Okay, I admit, it's because I screwed up a little and used that as a fixer upper...and then I did the same to the other middle finger so that it'd be even! After the red, I put blue ice shimmer polish on to dress it up a bit. It made the red look a little more like fushia, but still kept the red colour enough to pass for a CNY design.
Tip: Whenever you mess up a little, try thinking of a way to change it so that it still suits your design, instead of taking it off and re-doing it all over again. Your nails don't have to be identical, it actually makes it more interesting when each nail has it's unique look. It'll also save you nail polish, time and effort...and prevent the possibility of messing up other nails while trying to remove the polish off one - trust me, I've experienced it.
The nail designs that I have shown are still quite simple, but I hope I've given you some inspiration to start creating your own designs! Once I get my nail stand (which was sold out when I went to buy it), I will be ready to start designing on fake nails! Exciting! :)
I recently visited Daiso (a $2 store in Richmond) and purchased a decent amount of items to add to my nail design collection!
What I bought: French manicure tape, nail art brushes, pack of 50 fake nails, nail glue & glue remover
I was quite excited to find a pack of 8 nail art brushes for only $2. I never really considered using separate brushes...I just went for the easy route of buying a set of nail art pens so I wouldn't have to keep cleaning the brush. But for $2 - heck, they can be disposable!
Well, I'm off to bed! Thanks for reading & following my blog, everyone!


